Dough Tips
Temperature: Buy a waterproof dough thermometer with a probe, and use it. Your yeast bread dough should come out of the mixing bowl or off the table, (if mixing by hand) after mixing from 76° to 80°ƒ (23.8° to 26.6° c). If the dough temperature is higher than this, flatten it out, place it in a oiled plastic bag and refrigerate it for 30 minutes. After the cool down time, place the dough still covered on the kitchen counter (65° to 75° ƒ., for its first rise. Too warm a dough is very detrimental to good bread texture and taste, as it will burn up the yeast and an off-color dough with a “yeasty” beer taste will occur and the loaf size will greatly be diminished.
Weigh Your Recipes: If the recipe you have gives ounces, hundredths of pounds or gram weights, use them. You will be amazed at the consistency of your products. For small quantity baking, do not try to use ounces as they are too large a unit for real accuracy, such as baking 1 to 4 loaves. Professionally grams or hundredths of a pound work the best but pounds and ounces are used extensively in large production plants.
Non-Iodized Salt: Use only non-iodized salt. Iodine attacks the yeast activity, slowing down the first fermentation and in delicate cakes can give an metallic flavor.
Use Caution When Using These: Orange, lemon or grapefruit oil or peel as well as cinnamon and alcohols in such forms as liqueur or wine will have a retarding effect and too high a percentage in a formula will stop the yeast activity completely.
Gelatin and Fruit: In Mousse fillings, cheese cakes or pie fillings where gelatin is being used some fruits such as Raspberries, Pineapple and Papayas can inhibit the thickening (gelatinization) process completely. The fruit must be neutralized in some way before they can be used such as an addition of baking soda.
Never warm your bread dough: During its first rise, (the time after the mixing process) room temperature of 65°ƒ to 85°ƒ (18.3° to 30° c) is a perfect environment for good vigorous fermentation.
Plastic vs Cloth: Use a lightly oiled plastic bag or dough containers, place the dough inside, close bag, remove air, giving plenty of room for expansion. Let the dough rise the first time undisturbed by drafts. Never use a dry or moist cotton cloth to cover the dough as it wicks the moisture out of the dough and causes a skin to form which will limit the expansion of the dough and you will end up with a smaller loaf than you desire.
Do not overload your oven: Good air circulation is essential for proper baking and bread loaf color. Watch crust color, if bread is browning too rapidly, either turn the oven down 25 degrees ƒ, or use aluminum foil to tent the loaves. Loaf pans should never be closer than 4" apart during the baking process. When baking cakes, bake high in the oven and do not place pans of different size on the same pan.
Rich Dough Needs Special Handling: Rich dough’s are those that have high levels of butter, over 20%, eggs over 15%, sugar over 8% and possibly milk in place of water. After mixing the dough and approximate, one (1) hour rising time, slow the fermentation down by a period of refrigeration. They should be refrigerated from one (1) and up to twelve (12) hours. This cooling down process will have many beneficial effects on the dough’s finished taste, volume and shelf life, if the following tips are followed:
Bake according to the formula, watching the color of the cracks. If the cracks are a proper golden brown the bread is done. 180° ƒ internal temperature is when starches are set and the product is done. Check the center loaf in the center of the oven.
Handle Dough Gently: Do not beat the dough down after the first rise (first fermentation) one quick open-handed bang will do. Over-molding may cause breakage of the surface and surface tension, which will result in a smaller, broken rough, open surface of the finished loaf which will also yield a dryer almost stale tasting crumb, flat loaf.
Use Less Yeast: 2% is a good starting point. If you want large crumb structure with random bubbles as found in artisan breads, use a higher % of water, give longer fermentation time and go down on the % of yeast used or go to a sponge and dough method and go down even further on the % of yeast used. Time and fermentation is everything.
Artisan Bread: When a “Artisan Type” crusty bread is desired, use a lower protein flour such as one with 11.5 to 12.5% protein content. The lower the protein content the lower the moisture absorption rate of the flour, thus thicker crust results. When the baking time is completed, open oven door, turn off oven and “harden off” the crust for 5 to 10 minutes before removing bread from oven. If a thin delicate crust is called for such as the delicate brioche or challah, use a stronger protein flour, 13.5 to 15% since the stronger the flour the higher the absorption rate the thinner the crust, an adjustment on the level of liquid must be made upward.
Use Caution with Cinnamon: Cinnamon has a direct effect on the yeast activity and in large quantities it will stop fermentation completely. Keep high percentages of cinnamon out of the dough itself and in fillings, use it where it can have only limited effect on the yeast activity such as in fillings of dough where a long fermentation is desired.
Optimum Dough Temperature: Check the dough temperature as it comes out of the bowl, the optimum temperature for good yeast activity is 76°ƒ to 80°ƒ (26°c). Rarely can a baker control the room temperature or the flour temperature but the water or liquid temperature can be controlled easily by using a dough thermometer and checking a water temperature of the water to be used. Charts for the proper water temperature to be used are found in many professional baking books or by requesting one from International School of Baking. Specify C or F or use the following formula: [Dough Temperature Desired x 3] — [Machine Friction Average+Flour Temperature+Room Temperature] = Water Temperature to Use
For example: If you would like a dough temperature of 82°ƒ/27.78°c,
Weigh Your Recipes: If the recipe you have gives ounces, hundredths of pounds or gram weights, use them. You will be amazed at the consistency of your products. For small quantity baking, do not try to use ounces as they are too large a unit for real accuracy, such as baking 1 to 4 loaves. Professionally grams or hundredths of a pound work the best but pounds and ounces are used extensively in large production plants.
Non-Iodized Salt: Use only non-iodized salt. Iodine attacks the yeast activity, slowing down the first fermentation and in delicate cakes can give an metallic flavor.
Use Caution When Using These: Orange, lemon or grapefruit oil or peel as well as cinnamon and alcohols in such forms as liqueur or wine will have a retarding effect and too high a percentage in a formula will stop the yeast activity completely.
Gelatin and Fruit: In Mousse fillings, cheese cakes or pie fillings where gelatin is being used some fruits such as Raspberries, Pineapple and Papayas can inhibit the thickening (gelatinization) process completely. The fruit must be neutralized in some way before they can be used such as an addition of baking soda.
Never warm your bread dough: During its first rise, (the time after the mixing process) room temperature of 65°ƒ to 85°ƒ (18.3° to 30° c) is a perfect environment for good vigorous fermentation.
Plastic vs Cloth: Use a lightly oiled plastic bag or dough containers, place the dough inside, close bag, remove air, giving plenty of room for expansion. Let the dough rise the first time undisturbed by drafts. Never use a dry or moist cotton cloth to cover the dough as it wicks the moisture out of the dough and causes a skin to form which will limit the expansion of the dough and you will end up with a smaller loaf than you desire.
Do not overload your oven: Good air circulation is essential for proper baking and bread loaf color. Watch crust color, if bread is browning too rapidly, either turn the oven down 25 degrees ƒ, or use aluminum foil to tent the loaves. Loaf pans should never be closer than 4" apart during the baking process. When baking cakes, bake high in the oven and do not place pans of different size on the same pan.
Rich Dough Needs Special Handling: Rich dough’s are those that have high levels of butter, over 20%, eggs over 15%, sugar over 8% and possibly milk in place of water. After mixing the dough and approximate, one (1) hour rising time, slow the fermentation down by a period of refrigeration. They should be refrigerated from one (1) and up to twelve (12) hours. This cooling down process will have many beneficial effects on the dough’s finished taste, volume and shelf life, if the following tips are followed:
- Greater loaf volume will be achieved because you will get what is called greater “oven spring” when the dough is placed in the oven at 3/4th proofed.
- Cold dough is easier to handle when forming into the final desired shape as high butter and high egg dough tend to be softer and hard to handle.
- The cooling process gives a slower portion of the first rise, which will have the beneficial effect of a clean flavor and longer shelf life of the final baked product.
- After dough is removed from refrigerator, form dough cold into desired shapes, let it rise in a draft free place until dough doubles to triples in volume, as specified in the formula.
Bake according to the formula, watching the color of the cracks. If the cracks are a proper golden brown the bread is done. 180° ƒ internal temperature is when starches are set and the product is done. Check the center loaf in the center of the oven.
Handle Dough Gently: Do not beat the dough down after the first rise (first fermentation) one quick open-handed bang will do. Over-molding may cause breakage of the surface and surface tension, which will result in a smaller, broken rough, open surface of the finished loaf which will also yield a dryer almost stale tasting crumb, flat loaf.
Use Less Yeast: 2% is a good starting point. If you want large crumb structure with random bubbles as found in artisan breads, use a higher % of water, give longer fermentation time and go down on the % of yeast used or go to a sponge and dough method and go down even further on the % of yeast used. Time and fermentation is everything.
Artisan Bread: When a “Artisan Type” crusty bread is desired, use a lower protein flour such as one with 11.5 to 12.5% protein content. The lower the protein content the lower the moisture absorption rate of the flour, thus thicker crust results. When the baking time is completed, open oven door, turn off oven and “harden off” the crust for 5 to 10 minutes before removing bread from oven. If a thin delicate crust is called for such as the delicate brioche or challah, use a stronger protein flour, 13.5 to 15% since the stronger the flour the higher the absorption rate the thinner the crust, an adjustment on the level of liquid must be made upward.
Use Caution with Cinnamon: Cinnamon has a direct effect on the yeast activity and in large quantities it will stop fermentation completely. Keep high percentages of cinnamon out of the dough itself and in fillings, use it where it can have only limited effect on the yeast activity such as in fillings of dough where a long fermentation is desired.
Optimum Dough Temperature: Check the dough temperature as it comes out of the bowl, the optimum temperature for good yeast activity is 76°ƒ to 80°ƒ (26°c). Rarely can a baker control the room temperature or the flour temperature but the water or liquid temperature can be controlled easily by using a dough thermometer and checking a water temperature of the water to be used. Charts for the proper water temperature to be used are found in many professional baking books or by requesting one from International School of Baking. Specify C or F or use the following formula: [Dough Temperature Desired x 3] — [Machine Friction Average+Flour Temperature+Room Temperature] = Water Temperature to Use
For example: If you would like a dough temperature of 82°ƒ/27.78°c,
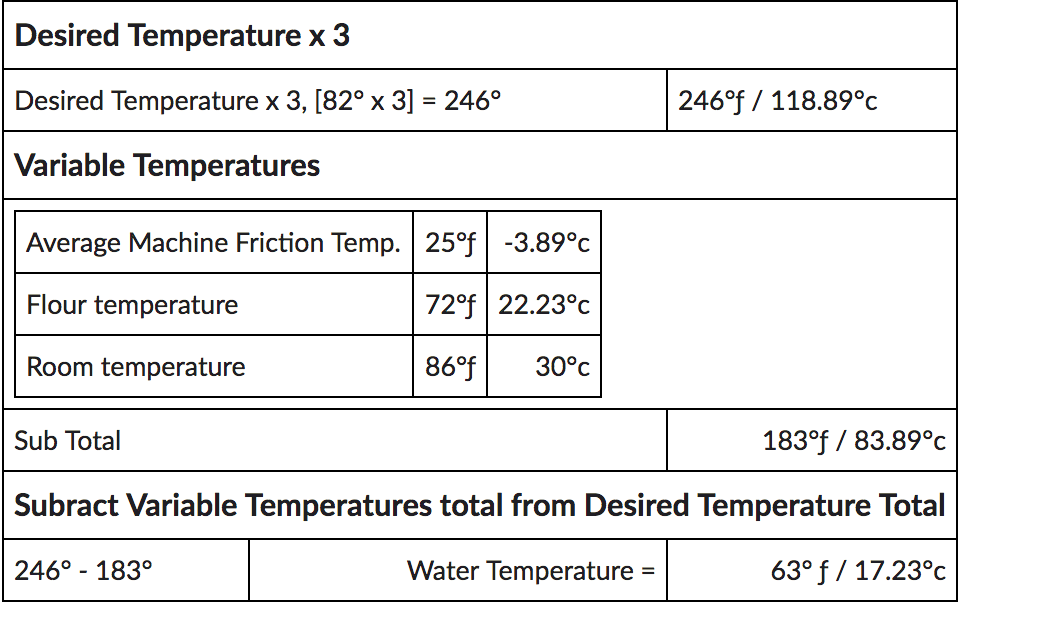
Under warm baking conditions, crushed ice in water or ice-water is often necessary to achieve a proper water temperature.
Internal Temperature: The internal temperature of a finished Loaf of bread, cake or pastry should be no less than 180°ƒ to maximum 210°ƒ. Below 180°ƒ, the starches are not set and the loaf or cake is not done; above 210°ƒ, the loaf or cake is beginning to stale while still in the baking process, causing the loss of more than 10% of it’s moisture (product) weight. A great way to check proper baking time is to weigh the product before and after the baking process. Baking loss should be in the 10% range for regular breads and artisan type thick crusted breads can safely loose up to 13% without adverse shelf life effects.
Here is a list of common weight loss percentages:
Baking Soda Test: Baking soda can age--little known fact. To test, add a couple tablespoons of white distilled vinegar into a small cup, add 1 teaspoon of baking soda and stand back. If it froths like mad, it's good.
Baking powder test: To see if your baking powder is still active, stir a teaspoon of baking powder into a half cup of hot water, it should bubble vigorously. If it doesn’t, discard. Always date container of baking powder for the date to be discarded not the date opened, 6 months maximum, 4 months when holding baking powder in high humidity conditions.
Dutch Cocoa: Use alkalized cocoa (Dutch processed) to intensify taste & flavor in baked goods as you can use less by 10% than regular cocoa. When adding Dutch processed cocoa you will need to subtract the same amount of flour for what ever amount of cocoa used in the formula and subtract by half the amount of baking soda used as well.
Converting to a Weighed Formula: When weighing cups, teaspoons and tablespoons in a recipe to develop a “weighed formula”, do not assume that all flours weigh the same:
Chart of yeasted dough relating the consistency of the dough with the water content %:
Internal Temperature: The internal temperature of a finished Loaf of bread, cake or pastry should be no less than 180°ƒ to maximum 210°ƒ. Below 180°ƒ, the starches are not set and the loaf or cake is not done; above 210°ƒ, the loaf or cake is beginning to stale while still in the baking process, causing the loss of more than 10% of it’s moisture (product) weight. A great way to check proper baking time is to weigh the product before and after the baking process. Baking loss should be in the 10% range for regular breads and artisan type thick crusted breads can safely loose up to 13% without adverse shelf life effects.
Here is a list of common weight loss percentages:
- Baguette 1.10 lb. (500g) 17%
- Artisan breads proofed in reed basket 10%
- Artisan bread regular proof in dry box 12%
- Pullman Pan bread 1.10 lb. (500g) 9%
- Pan bread, no cover 10%
- Rolls & Buns 20%
Baking Soda Test: Baking soda can age--little known fact. To test, add a couple tablespoons of white distilled vinegar into a small cup, add 1 teaspoon of baking soda and stand back. If it froths like mad, it's good.
Baking powder test: To see if your baking powder is still active, stir a teaspoon of baking powder into a half cup of hot water, it should bubble vigorously. If it doesn’t, discard. Always date container of baking powder for the date to be discarded not the date opened, 6 months maximum, 4 months when holding baking powder in high humidity conditions.
Dutch Cocoa: Use alkalized cocoa (Dutch processed) to intensify taste & flavor in baked goods as you can use less by 10% than regular cocoa. When adding Dutch processed cocoa you will need to subtract the same amount of flour for what ever amount of cocoa used in the formula and subtract by half the amount of baking soda used as well.
Converting to a Weighed Formula: When weighing cups, teaspoons and tablespoons in a recipe to develop a “weighed formula”, do not assume that all flours weigh the same:
- High gluten flour, 13.5 to 14% protein 1 C = 0.348 lbs. (157.8 g)
- Medium bread flour, 11.5 to 13% protein 1C= 0.331 lb. (150 g)
- Pastry flour, unbleached, 5.9 to 9% protein 1C= 0.30 lb. (136 g)
- White wholewheat flour 1 C= 0.29 lb. (136.5 g)
- Cake flour, bleached, 3 to 5% protein, un-sifted, 1 C=0.30 lb. (136 g)
- All Purpose flour ranges in protein levels around the US from 7 to 11.5% thus the weights are all over the place. In the northwest All purpose Flour is approximately 1 C = o.28 lb. (127 g)
- Rye flours whether dark, medium or light 1C=0.25 lb. (113.3 g)
Chart of yeasted dough relating the consistency of the dough with the water content %:
Consistency |
Water Content |
Stiff & dry |
54 to 58% (such as Bagels or Pita) |
Firm & tight |
58 to 60% |
Medium firm |
62 to 64% |
Malleable |
64 to 66% |
Soft |
66 to 75% |
Soft & sticky |
75 to 90% (batters) Ciabatta |
American style loaf and roll type breads |
60 to 62% |
The French style breads |
60 to 65% |
Italian style breads |
68 to 70% |
Hydration content is not the only factor considered. Hydration and the type of flour, must be considered. Example rye and wholewheat flour absorb much more liquid than a medium bread flour. Each ingredient must be considered in the making of a bread formula.
Conversion of powdered gelatine to gelatine sheets: Powdered gelatine has the strength of the Gold Sheets which is 200 bloom strength, 2 g per sheet (0.004 lb.) Silver sheets are 160-190 bloom strength, silver is 2.5 g per sheet ( 0.005 lb.) Bronze is 125 to 155 bloom strength, each sheet weighs 3.3 g (0.007 lb.) Titanium is 235 to 265 in strength, each sheet weighs 3 g (0.006 lb.)
EXAMPLE: 10 g (0.022 lb.) Powdered gelatine will set 1.10 lbs 500g of water 5 sheets of gold gelatine will set the same 500g (1.10 lbs.) of water.
The higher the bloom strength the stiffer the gelatin will be and more expensive.
Why a higher grade of gelatine is preferred?
The Delayed Salt Method: Salt toughens the gluten matrix. Adding salt at the beginning of the mixing process, necessitates a longer mixing time to fully develop the dough. However, by adding the salt later ( 5 to 6 minutes) in the mixing process you may reduce the mixing time up to 15%. Additionally the heat generated by the friction can be reduced. By adding the salt later during the mixing process, bakers can save on energy costs needed to make the dough as well as getting approximately 10% greater volume in the finished loaf.
Conversion of powdered gelatine to gelatine sheets: Powdered gelatine has the strength of the Gold Sheets which is 200 bloom strength, 2 g per sheet (0.004 lb.) Silver sheets are 160-190 bloom strength, silver is 2.5 g per sheet ( 0.005 lb.) Bronze is 125 to 155 bloom strength, each sheet weighs 3.3 g (0.007 lb.) Titanium is 235 to 265 in strength, each sheet weighs 3 g (0.006 lb.)
EXAMPLE: 10 g (0.022 lb.) Powdered gelatine will set 1.10 lbs 500g of water 5 sheets of gold gelatine will set the same 500g (1.10 lbs.) of water.
The higher the bloom strength the stiffer the gelatin will be and more expensive.
Why a higher grade of gelatine is preferred?
- Higher melting and solidification point.
- Shorter setting time
- Lower amount needed
- Lighter color
- Less odor and taste.
The Delayed Salt Method: Salt toughens the gluten matrix. Adding salt at the beginning of the mixing process, necessitates a longer mixing time to fully develop the dough. However, by adding the salt later ( 5 to 6 minutes) in the mixing process you may reduce the mixing time up to 15%. Additionally the heat generated by the friction can be reduced. By adding the salt later during the mixing process, bakers can save on energy costs needed to make the dough as well as getting approximately 10% greater volume in the finished loaf.